
Using Terraform with the KVM provider and cloud-init to spin up virtual machines while keeping the infrastructure’s configuration as code.
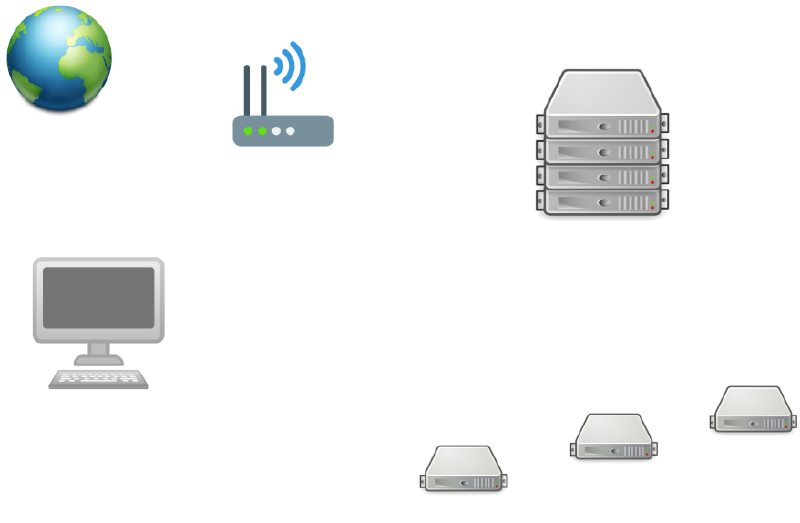
Visualizing the topology#
By the end of this post our infrastructure should look like this diagram, we’ll only be working with 3 VMs for now and we will set up the rest in a later post; at the very least it should be identical from the hypervisor and downstream.
Setup Terraform to work with the libvirt provider#
Install Terraform into the box serving as the KVM hypervisor; mine is my homeserver running Debian.
Make a directory which will hold all the files we’re going to work with.
In order to use the libvirt provider we need to define it within Terraform’s environment. For this we make a dedicated file called providers.tf which looks like this:
$ cat providers.tf
terraform {
  required_providers {
    libvirt = {
      source = "dmacvicar/libvirt"
    }
  }
}

provider "libvirt" {
uri = "qemu:///system"
}
Now we type:
$ terraform init
This will download the provider and our Terraform environment will be initialized.
There’s a bug with AppArmor templates and KVM/Qemu regarding ownership of the hypervisor volumes, we can get around it by appending a line to /etc/libvirt/qemu.conf.
$ echo 'security_driver = "none"' >> /etc/libvirt/qemu.conf
Terraform configuration file for first box#
Let’s grab a cloud-ready image, I’m using Debian 11 (Bullseye). This is a qcow2 cloud image which boots straight into Debian without needing any installation. In order to set the root password, ssh authentication keys and hostname we will use cloud-init which is nicely supported by our Terraform libvirt provider. But first let’s create the Terraform file for our first box.
I name the files after the boxes hostnames I plan to use, this first one we’ll name doris. So we create doris.tf looking like this:
$ cat doris.tf
resource "libvirt_volume" "doris" {
  name = "doris"
  pool = "default"
  source = "https://cloud.debian.org/images/cloud/bullseye/daily/latest/debian-11-generic-amd64-daily.qcow2"
  format = "qcow2"
}

resource "libvirt_cloudinit_disk" "commoninit-doris" {
          name = "commoninit-doris.iso"
          pool = "default"
          user_data = "${data.template_file.user_data-doris.rendered}"
        }

data "template_file" "user_data-doris" {
  template = "${file("${path.module}/cloud_inits/cloud_init-doris.cfg")}"
}

resource "libvirt_domain" "doris" {
  name = "doris"
  memory = "512"
  vcpu = 1

  cloudinit = "${libvirt_cloudinit_disk.commoninit-doris.id}"

  network_interface {
    network_name = "default"
        mac = "52:54:00:8f:52:f2"
  }

  disk {
       volume_id = "${libvirt_volume.doris.id}"
  }

  console {
    type        = "pty"
    target_port = "0"
    target_type = "serial"
  }

  console {
        type = "pty"
        target_type = "virtio"
        target_port = "1"
  }

  graphics {
    type = "vnc"
    listen_type = "address"
    autoport = "true"
  }
}
Feel free to adjust the virtual CPU cores and amount of RAM for the box.
Cloud-init#
As mentioned above we need to set up cloud-init to configure password and ssh-based authentication on the boxes. Each box will have its own cloud-init file.
We’ll make a directory to hold these files:
$ mkdir cloud_inits
Inside this directory we’ll create cloud_init-doris.cfg (the name is important since this is the name we’re referencing in doris.tf, you may change it to whatever scheme you want but you’ll also need to change the referencing in the Terraform file) the file should look like the following:
$ cat cloud_inits/cloud_init-doris.cfg
#cloud-config
# vim: syntax=yaml
users:
  - name: root
    ssh_authorized_keys:
       - ssh-ed25519 AAAAC3NzaC1lZDI1NTE5AAAAIOY/U6D5FZ54e+PQqZ2j6DtBsqqm3LTa19e99KoiPduZ

ssh_pwauth: True
chpasswd:
  list: |
     root:nyaa
  expire: False
disable_root: false

growpart:
  mode: auto
  devices: ['/']

runcmd:
 - sed  -i '/PermitRootLogin/s/.*/PermitRootLogin without-password/' /etc/ssh/sshd_config
 - systemctl restart sshd
 - hostnamectl set-hostname doris.pygrn.lab
Change the entry under ssh_authorized_keys to reflect your ssh public key, change the entry under chpasswd to whatever password you want root to have, I’m simply using ‘nyaa’ because this network is an internal playground and won’t be accessible from outside my LAN; but one should NEVER use such a simplistic password for a root user (or any other user for that matter) in a production environment.
The entries under runcmd do the following:
- The first entry modifies
/etc/ssh/sshd_configto allow root login through ssh. - The second one restart the ssh daemon to apply the changes.
- The third one sets the box’s hostname. The hostname is a FQDN, this is especially important because we’ll be setting up DNS zones in shortly as well as static IP addresses at the hypervisor level among other things later.
Copy the boxes file configuration and modify its file name and name of VM to create a different VM Terraform file.
$ cp doris.tf cutxn.tf
$ sed -i 's/doris/cutxn/g' cutxn.tf
And again for a third VM:
$ cp doris.tf cutxo.tf
$ sed -i 's/doris/cutxo/g' cutxo.tf
We will also change the MAC addresses of the second and third boxes to something different so they don’t interfere with each other on the network:
$ sed -i 's/mac = "52:54:00:8f:52:f2"/mac = "52:54:00:8f:53:f3"/g' cutxn.tf
$ sed -i 's/mac = "52:54:00:8f:52:f2"/mac = "52:54:00:8f:54:f4"/g' cutxo.tf
Now we do the same for the cloud-init files:
$ cp cloud_inits/cloud_init-doris.cfg cloud_inits/cloud_init-cutxn.cfg
$ sed -i 's/doris/cutxn/g' cloud_inits/cloud_init-cutxn.cfg
Third file:
$ cp cloud_inits/cloud_init-doris.cfg cloud_inits/cloud_init-cutxo.cfg
$ sed -i 's/doris/cutxo/g' cloud_inits/cloud_init-cutxo.cfg
KVM hypervisor DNS configuration#
In order to set up a local DNS zone and static IPs for our virtual machines we will edit the default KVM network:
$ virsh net-edit --network default
We’ll add the following lines to the configuration file:
Here’s my complete configuration after applying the changes as an example:
<network>
  <name>default</name>
  <uuid>xxxxxxxx-xxxx-xxxx-xxxx-xxxxxxxxxxxx</uuid>
  <forward mode='nat'/>
  <bridge name='virbr0' stp='on' delay='0'/>
  <mac address='52:54:00:b4:81:a8'/>
  <domain name='pygrn.lab' localOnly='yes'/>
  <ip address='192.168.122.1' netmask='255.255.255.0'>
    <dhcp>
      <range start='192.168.122.2' end='192.168.122.254'/>
      <host mac='52:54:00:8f:52:f2' name='doris.pygrn.lab' ip='192.168.122.2'/>
      <host mac='52:54:00:8f:53:f3' name='cutxn.pygrn.lab' ip='192.168.122.3'/>
      <host mac='52:54:00:8f:54:f4' name='cutxo.pygrn.lab' ip='192.168.122.4'/>
    </dhcp>
  </ip>
</network>
Restart the KVM default network:
$ virsh net-destroy --network default
$ virsh net-start --network default
Terraform deployment#
Let’s check our configuration is working and see how it will be applied by Terraform.
$ terraform plan
Carefully read the output of this command as it indicates what Terraform is going to do once we pull the trigger. Errors in configuration should also appear here if we have made any.
Once happy with what the plan says, let’s actually deploy the boxes we specified in the configuration files we made:
$ terraform apply
Checking the infrastructure#
If everything went right we should now have three virtual machines with static (not really static, but the DHCP server will give the same IP to the respective box every time) IP addresses and within the local DNS zone pygrn.lab. We can do a network mapping scan to make sure everything is as expected:
$ nmap -sn 192.168.122.0/24
To test the DNS zone we can use dig (contained in the bind9-dnsutils package in Debian) pointing at the networking interface our virtual machines use as DHCP and DNS server. This gateway is a virtual network card created by KVM which has a dnsmasq server instance attached to it. We’ll use +noall +answer to filter the output so that it only shows us the section we’re interested in. Here’re the commands and their expected output:
Forward DNS:
$ dig +noall +answer doris.pygrn.lab @192.168.122.1
doris.pygrn.lab. 0 IN A 192.168.122.2
Reverse DNS:
$ dig +noall +answer -x 192.168.122.2 @192.168.122.1
2.122.168.192.in-addr.arpa. 0 IN PTR doris.pygrn.lab.
If the output of those commands matches the sample I’ve just given we then have a fully working DNS zone with forward and reverse lookups working for our three virtual machines.
Let’s now login into one the virtual machines through ssh:
$ ssh -i [/path/to/ssh/key] root@192.168.122.2
The [path/to/ssh/key] after the -i switch refers to the path in the computer serving as the hypervisor where the private key which corresponds to the public key we set up in the cloud_inits is stored. You should now have a bash prompt in the machine called doris.
From here we can check our DNS settings as well if we wanted to; I’ll drop a screengrab with a couple commands I ran to do it.
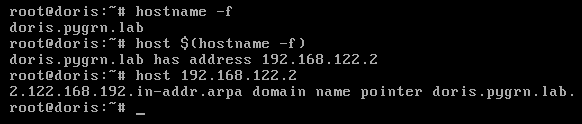
In the next article we’ll do further configuration using Ansible and set up our first service with Docker.